
Originally published on the Just Eat Takeaway Engineering Blog.
Overview
In this article, we’ll discuss the way our mobile teams have evolved the Continuous Integration (CI) stack over the recent years. We don’t have DevOps engineers in our team and, until recently, we had adopted a singular approach in which CI belongs to the whole team and everyone should be able to maintain it. This has proven to be difficult and extremely time-consuming.
The Just Eat side of our newly merged entity has a dedicated team providing continuous integration and deployment tools to their teams but they are heavily backend-centric and there has been little interest in implementing solutions tailored for mobile teams. As is often the case in tech companies, there is a missing link between mobile and DevOps teams.
The iOS team is the author and first consumer of the solution described but, as you can see, we have ported the same stack to Android as well. We will mainly focus on the iOS implementation in this article, with references to Android as appropriate.
2016–2020
Historically speaking, the iOS UK app was running on Bitrise because it was decided not to invest time in implementing a CI solution, while the Bristol team was using a Jenkins version installed by a different team. This required manual configuration with custom scripts and it had custom in-house hardware. These are two quite different approaches indeed and, at this stage, things were not great but somehow good enough. It’s fair to say we were still young on the DevOps front.
When we merged the teams, it was clear that we wanted to unify the CI solution and the obvious choice for a company of our size was to not use a third-party service, bringing us to invest more and more in Jenkins. Only one team member had good knowledge of Jenkins but the rest of the team showed little interest in learning how to configure and maintain it, causing the stack to eventually become a dumping ground of poorly configured jobs.
It was during this time that we introduced Fastlane (making the common tasks portable), migrated the UK app from Bitrise to Jenkins, started running the UI tests on Pull Requests, and other small yet sensible improvements.
2020–2021
Starting in mid-2020 the iOS team has significantly revamped its CI stack and given it new life. The main goals we wanted to achieve (and did by early 2021) were:
- Revisit the pipelines
- Clear Jenkins configuration and deployment strategy
- Make use of AWS Mac instances
- Reduce the pool size of our mac hardware
- Share our knowledge across teams better
Since the start of the pandemic, we have implemented the pipelines in code (bidding farewell to custom bash scripts), we moved to a monorepo which was a massive step ahead and began using SonarQube even more aggressively.
We added Slack reporting and PR Assigner, an internal tool implemented by Andrea Antonioni. We also automated the common release tasks such as cutting and completing a release and uploading the dSYMS to Firebase.
We surely invested a lot in optimizing various aspects such as running the UI tests in parallel, making use of shallow repo cloning, We also moved to not checking in the pods within the repo. This, eventually, allowed us to reduce the number of agents for easier infrastructure maintenance.
Automating the infrastructure deployment of Jenkins was a fundamental shift compared to the previous setup and we have introduced AWS Mac instances replacing part of the fleet of our in-house hardware.
CI system setup
Let’s take a look at our stack. Before we start, we’d like to thank Isham Araia for having provided a proof of concept for the configuration and deployment of Jenkins. He talked about it at https://ish-ar.io/jenkins-at-scale/ and it represented a fundamental starting point, saving us several days of researching.
Triggering flow
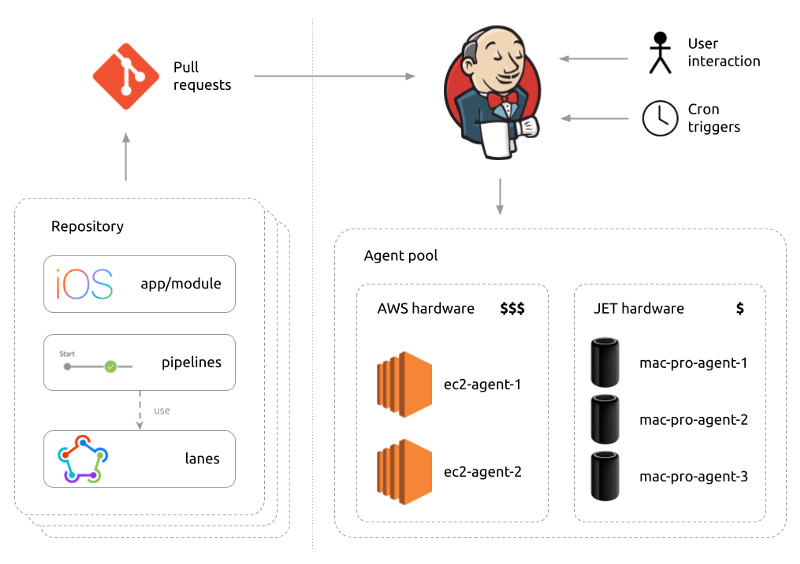
Starting from the left, we have our repositories (plural, as some shared dependencies don’t live in the monorepo). The repositories contain the pipelines in the form of Jenkinsfiles and they call into Fastlane lanes. Pretty much every action is a lane, from running the tests to archiving for the App Store to creating the release branches.
Changes are raised through pull requests that trigger Jenkins. There are other ways to trigger Jenkins: by user interaction (for things such as completing a release or archiving and uploading the app to App Store Connect) and cron triggers (for things such as building the nightly build, running the tests on the develop branch every 12 hours, or uploading the PACT contract to the broker).
Once Jenkins has received the information, it will then schedule the jobs to one of the agents in our pool, which is now made up of 5 agents, 2 in the cloud and 3 in-house mac pros.
Reporting flow
Now that we’ve talked about the first part of the flow, let’s talk about the flow of information coming back at us.
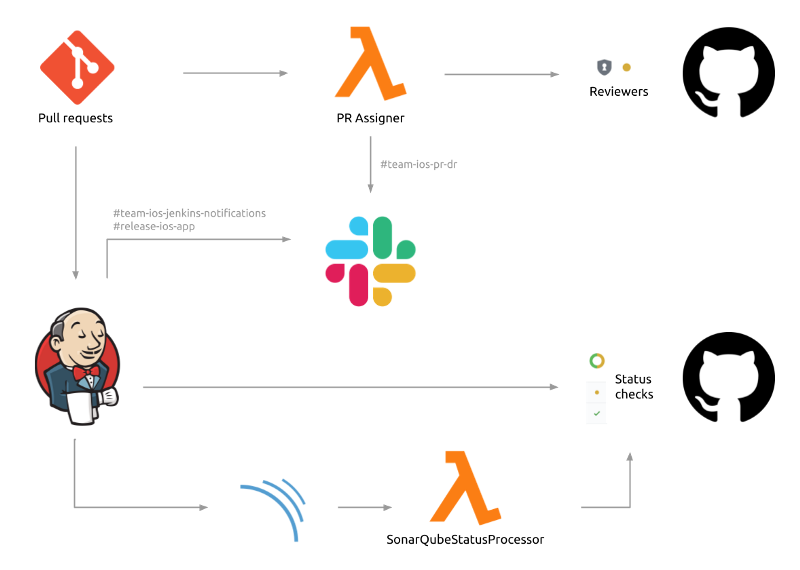
Every PR triggers PR Assigner, a tool that works out a list of reviewers to assign to pull requests and notifies engineers via dedicated Slack channels. The pipelines post on Slack, providing info about all the jobs that are being executed so we can read the history without having to log into Jenkins. We have in place the standard notification flow from Jenkins to GitHub to set the status checks and Jenkins also notifies SonarQube to verify that any change meets the quality standards (namely code coverage percentage and coding rules).
We also have a smart lambda named SonarQubeStatusProcessor that reports to GitHub, written by Alan Nichols. This is due to a current limitation of SonarQube, which only allows reporting the status of one SQ project to one GitHub repo. Since we have a monorepo structure we had to come up with this neat customization to report the SQ status for all the modules that have changed as part of the PR.
Configuration
Let’s see what the new interesting parts of Jenkins are. Other than Jenkins itself and several plugins, it’s important to point out JCasC and Job DSL.
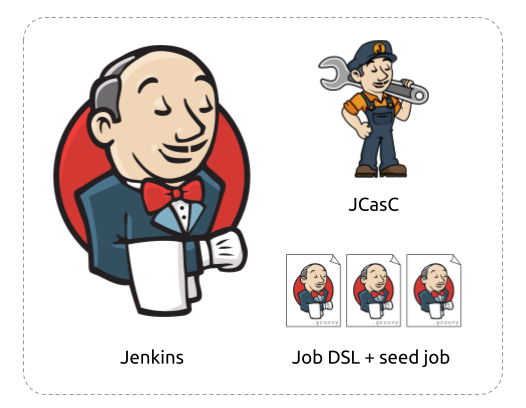
JCasC stands for Jenkins Configuration as Code, and it allows you to configure Jenkins via a yaml file.
The point here is that nobody should ever touch the Jenkins settings directly from the configuration page, in the same way, one ideally shouldn’t apply configuration changes manually in any dashboard. The CasC file is where we define the Slack integration, the user roles, SSO configuration, the number of agents and so on.
We could also define the jobs in CasC but we go a step further than that.
We use the Job DSL plugin that allows you to configure the jobs in groovy and in much more detail. One job we configure in the CasC file though is the seed job. This is a simple freestyle job that will go pick the jobs defined with Job DSL and create them in Jenkins.
Deployment
Let’s now discuss how we can get a configured Jenkins instance on EC2. In other words, how do we deploy Jenkins?
We use a combination of tools that are bread and butter for DevOps people.

The commands on the left spawn a Docker container that calls into the tools on the right.
We start with Packer which allows us to create the AMI (Amazon Machine Image) together with Ansible, allowing us to configure an environment easily (much more easily than Chef or Puppet).
Running the create-image command the script will:
1. Create a temporary EC2 instance
2. Connect to the instance and execute an ansible playbook
Our playbook encompasses a number of steps, here’s a summary:
- install the Jenkins version for the given Linux distribution
- install Nginx
- copy the SSL cert over
- configure nginx w/ SSL termination and reverse proxy
- install the plugins for Jenkins
Once the playbook is executed, Packer will export an AMI in EC2 with all of this in it and destroy the instance that was used.
With the AMI ready, we can now proceed to deploy our Jenkins. For the actual deployment, we use Terraform which allows us to define our infrastructure in code.
The deploy command runs Terraform under the hood to set up the infrastructure, here’s a summary of the task:
- create an IAM Role + IAM Policy
- configure security groups
- create the VPC and subnet to use with a specific CIDER block and the subnet
- create any private key pair to connect over SSH
- deploy the instance using a static private IP (it has to be static otherwise the A record in Route53 would break)
- copy the JCasC configuration file over so that when Jenkins starts it picks that up to configure itself
The destroy command runs a “terraform destroy” and destroys everything that was created with the deploy command. Deploy and destroy balance each other out.
Now that we have Jenkins up and running, we need to give it some credentials so our pipelines are able to work properly. A neat way of doing this is by having the secrets (SSH keys, Firebase tokens, App Store Connect API Key and so forth) in AWS Secrets Manager which is based on KMS and use a Jenkins plugin to allow Jenkins to access them.
It’s important to note that developers don’t have to install Packer, Ansible, Terraform or even the AWS CLI locally because the commands run a Docker container that does the real work with all the tools installed. As a result, the only thing one should have installed is really Docker.
CI agents
Enough said about Jenkins, it’s time to talk about the agents.As you probably already know, in order to run tests, compile and archive iOS apps we need Xcode, which is only available on macOS, so Linux or Windows instances are not going to cut it.
We experimented with the recently introduced AWS Mac instances and they are great, ready out-of-the-box with minimal configuration on our end.
What we were hoping to get to with this recent work was the ability to leverage the Jenkins Cloud agents. That would have been awesome because it would have allowed us to:
- let Jenkins manage the agent instances
- scale the agent pool according to the load on CI
Sadly we couldn't go that far. Limitations are:
- the bootstrapping of a mac1.metal takes around 15 minutes
- reusing the dedicated host after having stopped an instance can take up to 3 hours — during that time we just pay for a host that is not usable
When you stop or terminate a Mac instance, Amazon EC2 performs a scrubbing workflow on the underlying Dedicated Host to erase the internal SSD, to clear the persistent NVRAM variables, and if needed, to update the bridgeOS software on the underlying Mac mini.
This ensures that Mac instances provide the same security and data privacy as other EC2 Nitro instances. It also enables you to run the latest macOS AMIs without manually updating the bridgeOS software. During the scrubbing workflow, the Dedicated Host temporarily enters the pending state. If the bridgeOS software does not need to be updated, the scrubbing workflow takes up to 50 minutes to complete. If the bridgeOS software needs to be updated, the scrubbing workflow can take up to 3 hours to complete.
Source: https://docs.aws.amazon.com/AWSEC2/latest/UserGuide/ec2-mac-instances.html
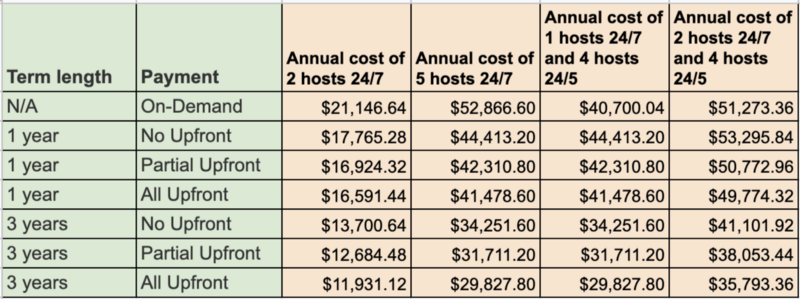
In other words: scaling mac instances is not an option and leaving the instances up 24/7 seems to be the easiest option. This is especially valid if your team is distributed and jobs could potentially run over the weekend as well, saving you the hassle of implementing downscaling ahead of the weekend.
There are some pricing and instance allocation considerations to make. Note that On-Demand Mac1 Dedicated Hosts have a minimum host allocation and billing duration of 24 hours.
“You can purchase Savings Plans to lower your spend on Dedicated Hosts. Savings Plans is a flexible pricing model that provides savings of up to 72% on your AWS compute usage. This pricing model offers lower prices on Amazon EC2 instances usage, regardless of instance family, size, OS, tenancy or AWS Region.”
Source: https://aws.amazon.com/ec2/dedicated-hosts/pricing/
The On-Demand rate is $1.207 per hour.
I’d like to stress that no CI solution comes for free. I’ve often heard developers indicating that Travis and similar products are cheaper. The truth is that the comparison is not even remotely reasonable: virtual boxes are incredibly slow compared to native Apple hardware and take ridiculous bootstrapping times. Even the smallest projects suffer terribly.
One might ask if it’s at least possible to use the same configuration process we used for the Jenkins instance (with Packer and Ansible) but sadly we hit additional limitations:
- Apple requires 2FA for downloading Xcode via xcode-version
- Apple requires 2FA for signing into Xcode
The above pretty much causes the configuration flow to fall apart making it impossible to configure an instance via Ansible.
Cloud agents for Android
It was a different story for Android, in which we could easily configure the agent instance with Ansible and therefore leverage the Cloud configuration to allow automatic agent provisioning.
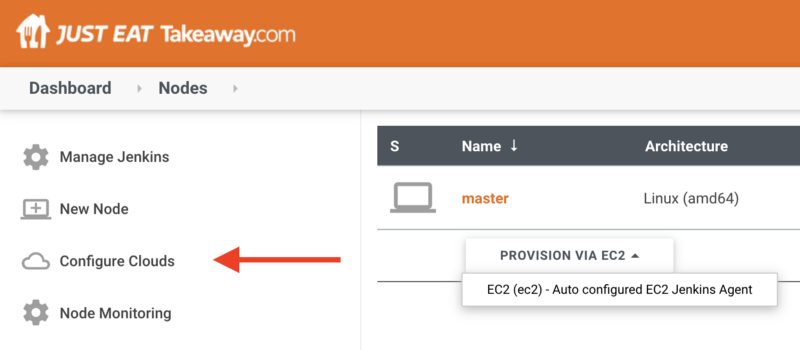
This configuration is defined via CasC as everything else.
To better control EC2 usage and costs, a few settings come in handy:
- minimum number of instances (up at all times)
- minimum number of spare instances (created to accommodate future jobs)
- instance cap: the maximum number of instances that can be provisioned at the same time
- idle termination time: how long agents should be kept alive after they have completed the job
All of the above allow for proper scaling and a lot less maintenance compared to the iOS setup. A simple setup with 0 instances up at all times allows saving costs overnight and given that in our case the bootstrapping takes only 2 minutes, we can rely on the idle time setting.
Conclusions
Setting up an in-house CI is never a straightforward process and it requires several weeks of dedicated work.
After years of waiting, Apple has announced Xcode Cloud which we believe will drastically change the landscape of continuous integration on iOS. The solution will most likely cause havoc for companies such as Bitrise and CircleCI and it’s reasonable to assume the pricing will be competitive compared to AWS, maybe running on custom hardware that only Apple is able to produce.
A shift this big will take time to occur, so we foresee our solution to stay in use for quite some time.
We hope to have inspired you on how a possible setup for mobile teams could be and informed you on what are the pros & cons of using EC2 mac instances.
